Changelog Darwin
Feature improvement
Nested Class Properties
You can now attach child properties to any class property and control exactly when they appear. Set a condition on the parent — such as when a specific value is selected — and the nested property shows up automatically. It stays hidden for every other selection. Annotators only see fields that are relevant to what they just labeled.
How it works:
In the class editor, open any property and use Add Nested Properties to attach child properties to it.
Each nested property appears when the parent is set or is any of a specific set of values.
Mark any nested property as required independently of the parent.
Keyframe behaviour inherits from the parent — consistent across the full hierarchy.
Properties nest to any depth: a nested property can carry its own nested properties.
Deleting a parent property removes all its children. A confirmation message lists what will be deleted before proceeding.

Jade Yip
Senior Product Manager
Feature improvement
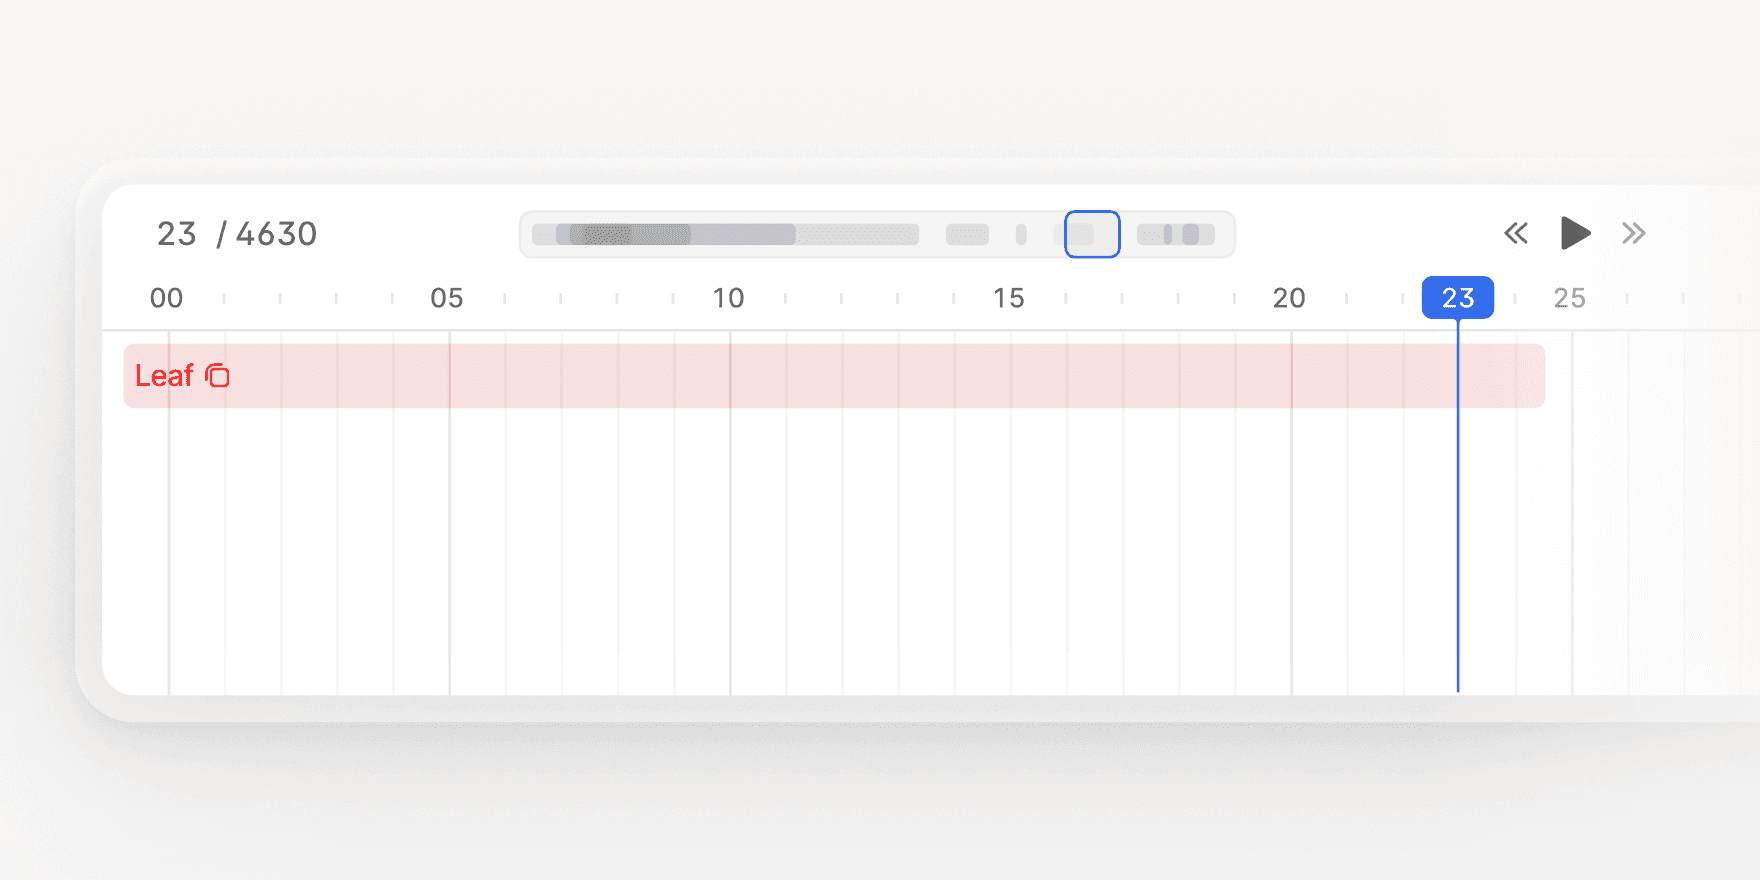
Timeline Disagreement Markers
Reviewers can now navigate directly to frames that need attention using red markers on the video timeline. A marker appears at any frame with an unresolved comment, a missing required property, or an annotation disagreement — no more scrubbing manually through long recordings to find issues.
Key details:
Markers appear in both the summary timeline and the main frame-by-frame view.
Three conditions trigger a marker: a missing annotation-level property, an unresolved comment, or a disagreement.
Use Ctrl + Shift + . to jump to the next marked frame, and Ctrl + Shift + , to go back to the previous one.
Markers clear automatically as you resolve each issue — fill in a missing property or resolve a comment and it's gone.
Item-level properties are not tied to a specific frame and do not appear as timeline markers, but remain visible in the Review tab.
Jade Yip
Senior Product Manager
Feature improvement
Class Properties in Logic Stage Rules
Logic Stages can now branch based on the properties set on individual annotations. Previously, routing conditions could only evaluate item-level properties. They can now inspect annotation-level class properties — so a workflow can take different paths depending on the specific values an annotator assigned to a class, not just metadata about the item as a whole.
How to configure:
In the Logic Stage editor, select Property as the condition type, then choose a class and its associated property from the dropdown.
Set conditions as is any of or is none of, for both single-select and multi-select properties.
Rules are evaluated in sequence; the first matching rule determines the routing path.
If no rules match, the item follows the else branch.
Jade Yip
Senior Product Manager
New model
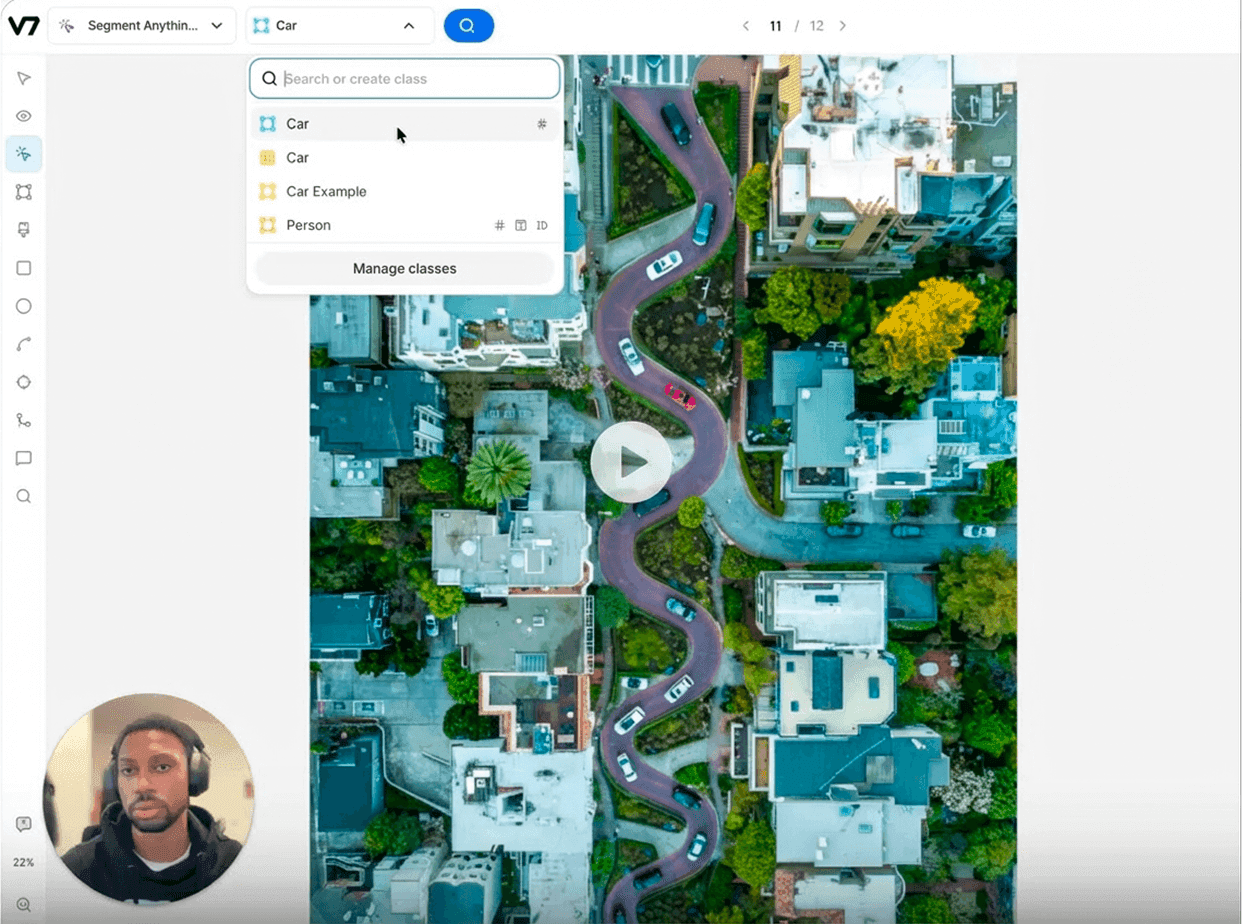
SAM 3: Text-Prompt Segmentation and Enhanced Auto-Tracking
SAM 3 is now live in V7 Darwin and brings significant improvements to both image segmentation and video annotation workflows. This major update introduces text-based automatic detection, higher accuracy segmentation, and enhanced auto-tracking capabilities powered by the latest SAM architecture.
What's New
SAM 3 can be used like the regular SAM you're familiar with. You can manual select objects for segmentation with a single click. Behind the scenes, SAM 3 preprocesses your image and creates polygon masks for all detected objects with improved accuracy compared to SAM 2.
The key breakthrough is automatic class detection based on class names. If you create a class called car, train, bicycle, or any other object type, you can now select it. Click the magnifying glass (Search) icon in the Darwin UI, and SAM 3 will automatically detect all instances of that class and segment them accordingly. The updated model supports approximately 4M unique concept labels.
How Class Detection Works
The detection uses the class name as a text prompt. If you name a class "player" and search a tennis match, SAM 3 finds and segments all players. Name another class "light pole" and search again to segment those separately. The class name serves as the prompt.
After detection, you can refine results manually. Delete false positives, adjust boundaries, or add missed instances using standard SAM point-and-click selection.
The video above shows both methods in action: the manual selection of a single object and the automatic selection of all instances based on the class name (these two can be used independently).
Learn more about using SAM 3:
The Benefits
Labeling datasets with hundreds of similar objects (cars on a parking lot, berries on a bush, bottles on a conveyor) used to mean clicking each one individually. SAM 3's text-based detection handles the bulk of that work in a single action. Combined with auto-tracking, you can annotate a video of pedestrians or a crowded retail floor in a fraction of the time. The accuracy improvement in tracking also reduces correction work. Fewer lost tracks mean fewer frames where you need to re-anchor an annotation or fix identity swaps.
Jade Yip
Senior Product Manager

New feature
Improved Dataset Organization with Custom Labels
You can now create custom Dataset Labels and assign them directly from the dataset settings page. If you have Workforce Manager permissions, you can manage these labels centrally. Editing a label’s name or color updates it instantly across all datasets. You can also update labels via the API.
Use labels to filter datasets, group them for a clearer overview, and quickly find what you need. Your filter and grouping preferences remain active for the duration of your session.
Labels are shared across your entire workspace to ensure everyone uses consistent terminology.
Jade Yip
Senior Product Manager

New feature
Split and Unify Video Annotations
Correcting video annotations in V7 Darwin is now more straightforward with new Split and Unify functionalities. These tools help you divide a single annotation across frames or merge multiple annotations into one. It is especially useful for fixing model outputs (like Auto-Track) or for instance swaps.
To split an annotation, select it, then use the Scissors icon or the Ctrl + S hotkey. The annotation divides at the currently selected frame. All properties and the original instance ID are copied to both resulting annotations. The newly created segment gets a new annotation ID. This is helpful when an object was incorrectly tracked as a single instance.
To unify two annotations, Cmd + click to select them in the canvas or timeline. Then, right click and choose "Unify" or use the Ctrl + M hotkey. This merges them into a single annotation.
Learn more: Managing Annotations with Merge, Subtract, Split, and Unify Tools
Jade Yip
Senior Product Manager

Feature improvement
Timeline Summary Mode for Video Annotation
V7 Darwin now includes Timeline Summary, a new feature designed to give you a high-level overview of your video annotations. With the timeline mode enabled, you can quickly review annotation coverage, navigate large files, and streamline your review process.
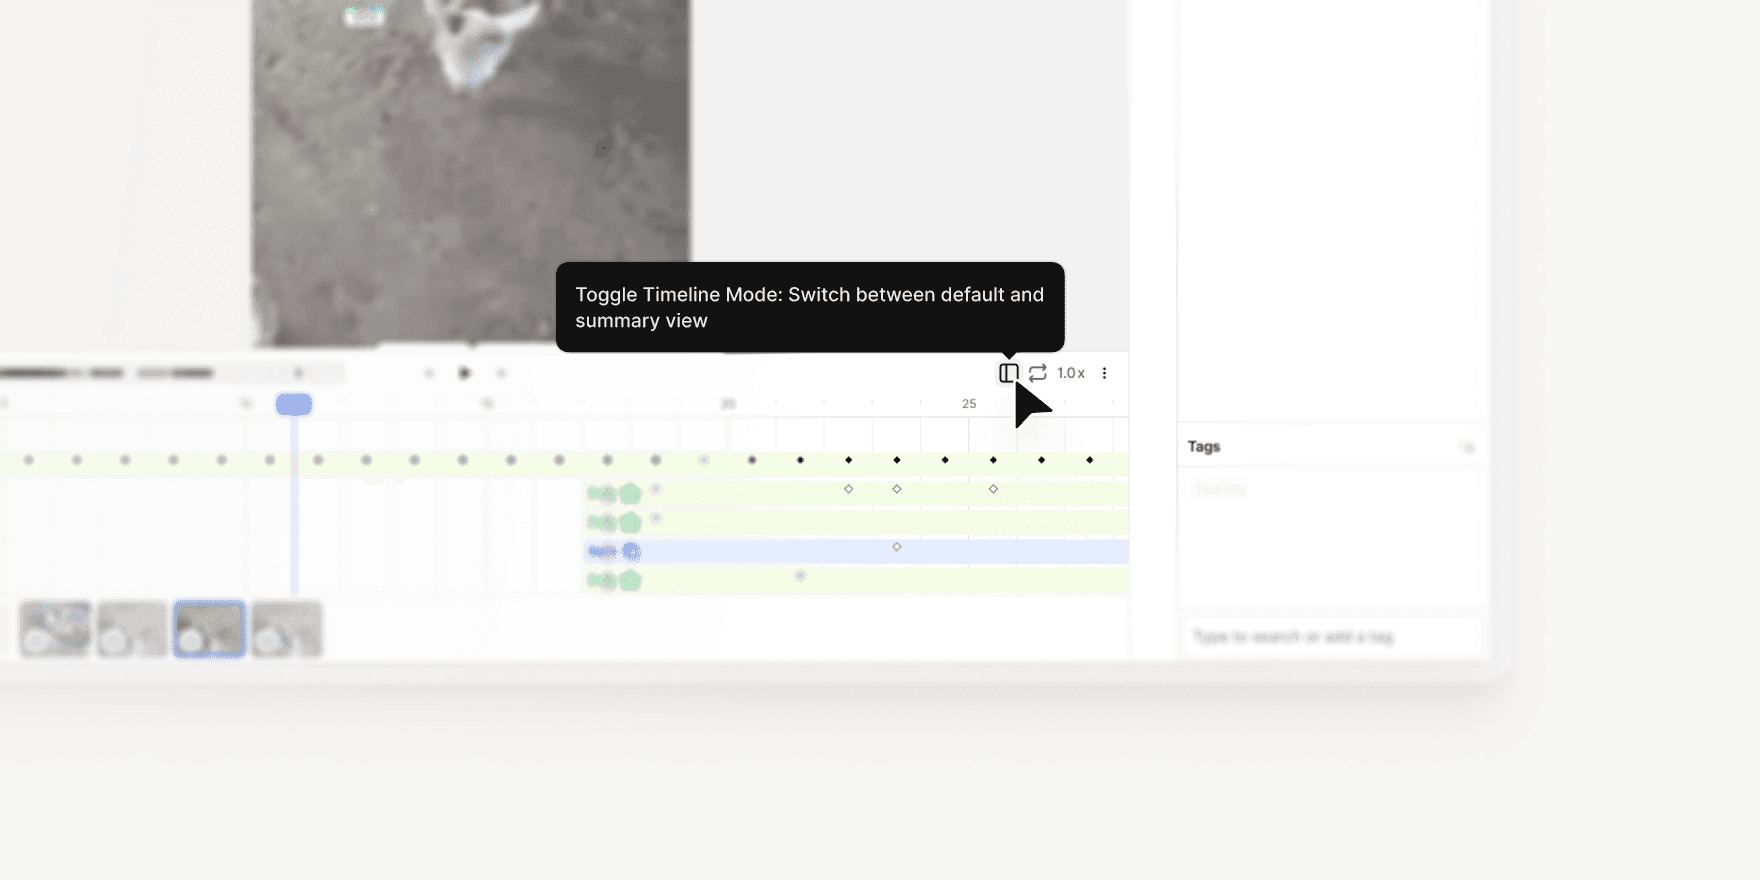
Access with Shift + D: Open Timeline Summary Mode using the new button on the right-hand side of the interface or the hotkey Shift + D.
Summary by Class: Annotations are grouped by class on the left panel. Expand any class to view individual annotations and their frame ranges.
Click to Jump: Click once on an annotation to navigate to it, or double-click to open it in the regular timeline.
Read-Only Mode: The summary timeline is read-only to prevent accidental edits. However, you can continue to edit annotations in the canvas and layer bar.
Clean View: Keyframes and detailed elements are hidden from the summary view, providing a clear, scannable overview.
Heatmap Overview: A heatmap at the top of the timeline shows annotation density across the video, with the zoomed-in section highlighted in blue for easy orientation.
Timeline Summary Mode makes it easier to navigate, audit, and review video annotations, especially for large or complex files.
Learn more: V7 Darwin Documentation
Jade Yip
Senior Product Manager
Feature improvement
Flood Fill Tool Now Available in V7 Darwin
This update lets you annotate volumetric regions in CT/MRI scans based on intensity similarity of connected voxels or pixels.
You can adjust tolerance levels and create annotation masks in just a few clicks. It works similarly to the flood filling functionality of Slicer 3D or to magic fill/paint bucket tools in image editing software like Photoshop. If you are familiar with these tools, you’ll feel right at home.
Key functionalities:
Switch between 3D or 2D fill for voxel or pixel-based masks
Adjust tolerance level to label similar regions automatically
Combine Flood Fill with Brushes for the highest level of control
The tool supports Mask-type annotations and is available for all relevant medical imaging files, like volumetric DICOM and NIfTI files. It will display on your annotation tools panel automatically if the file supports it.
Jade Yip
Senior Product Manager
Load More